Flow Charts
Topics Covered In This Chapter:
In this chapter, we are going to make a Hangman game. This game is more complicated than our previous game, but it is also much more fun. Because the game is advanced, we should first carefully plan it out by creating a diagram called a flow chart (explained later). In the next two chapters, we will actually write out the code for Hangman.
In case you've never played Hangman before, let's first learn the rules for Hangman.
How to Play "Hangman"
In case you don't know, Hangman is a game for two people that's usually played using paper and pencil. One player thinks of a word, and then draws a blank on the page for each letter in the word. Then the second player tries to guess letters that might be in the word. If they guess correctly, the first player writes the letter in the blank. If they guess incorrectly, the first player draws a single body part of the hanging man. If the second player can guess all the letters in the word before the man has been completely drawn, they win. But if they can't figure it out in time, the man is hanged and they lose the game!
Sample Run of "Hangman"
Here is an example of what the player might see when they run the Hangman program we will write later. The text that the player enters in shown in bold.
H A N G M A N
  +---+
  |   |
      |
      |
      |
      |
=========
Missed letters:
_ _ _
Guess a letter.
a
  +---+
  |   |
      |
      |
      |
      |
=========
Missed letters:
_ a _
Guess a letter.
o
  +---+
  |   |
  O   |
      |
      |
      |
=========
Missed letters: o
_ a _
Guess a letter.
r
  +---+
  |   |
  O   |
  |   |
      |
      |
=========
Missed letters: or
_ a _
Guess a letter.
t
  +---+
  |   |
  O   |
  |   |
      |
      |
=========
Missed letters: or
_ a t
Guess a letter.
a
You have already guessed that letter. Choose again. Guess a letter.
c
Yes! The secret word is "cat"! You have won!
Do you want to play again? (yes or no)
no
ASCII Art
Half of the lines of code in the Hangman program aren't really code at all, but are multiline strings that use keyboard characters to draw pictures. This type of graphics is called ASCII art (pronounced "ask-ee"), because keyboard characters (such as letters, numbers, and also all the other signs on the keyboard) are called ASCII characters. ASCII stands for American Standard Code for Information Interchange (we'll learn more about it in the Caesar Cipher chapter). Here are a couple cats done in ASCII art:

Designing a Program with a Flowchart
This game is a bit more complicated than the ones we've seen so far, so let's take a moment to think about how it's put together. First we'll create a flow chart (like the one at the end of the Dragon Realm chapter) to help us visualize what this program will do. A flow chart is a diagram that shows a series of steps as a number of boxes connected with arrows. Each box represents a step, and the arrows show how one step leads to other steps. You can trace through the flow chart by putting your finger on the "Start" box of the flow chart and following the arrows to other boxes until you get to the "End" box. You can only move from one box to another in the direction of the arrow. You can never go backwards (unless there is a second arrow going back, like in the "Player already guessed this letter" box below.) Here is the complete flow chart for the Hangman game (Figure 8.1).
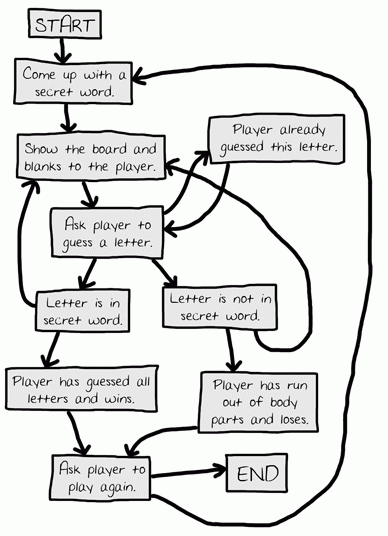
Of course, we don't have to make a flow chart. We could just start writing code. But often, once we start programming, we will think of things that need to be added or changed that we hadn't considered before. We may end up having to change or delete a lot of code that we had already written, which would be a waste of effort. To avoid this, it's always best to think carefully, and plan how the program will work before we start writing it.
The following flow chart is provided as an example of what flow charts look like and how to make them. For now, since you're just using the source code from this book, you don't need to draw a flow chart before writing code. The program is already written, so you don't have to plan anything out. But when you make your own games, a flow chart can be very handy.
Creating the Flow Chart
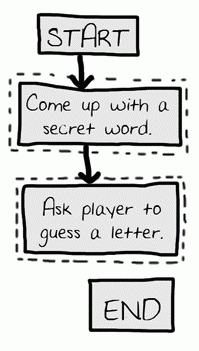
Keep in mind, your flow charts don't always have to look exactly like this one. As long as you understand the flow chart you made, it will be helpful when you start coding. We'll begin with a flow chart that only has a "Start" and an "End" box, as shown in Figure 8.2:

Now let's think about what happens when we play Hangman. First, one player (the computer in this case) thinks of a secret word. Then the second player (the person running the program) will guess letters. Let's add boxes for these events, as shown in Figure 8.3. (The boxes that are new to each flow chart have a dashed outline around them.) The arrows show the order that the program should move. That is, first the program should come up with a secret word, and after that it should ask the player to guess a letter.
But the game doesn't end after the player guesses one letter. It needs to check to see if that letter is in the secret word or not.