Collision Detection and Input
The Collision Detection Function
4. def doRectsOverlap(rect1, rect2):
In order to do collision detection, we will need a function that can determine if two rectangles intersect each other or not. Here is a picture of intersecting rectangles (on the left) and rectangles that do not intersect (on the right):
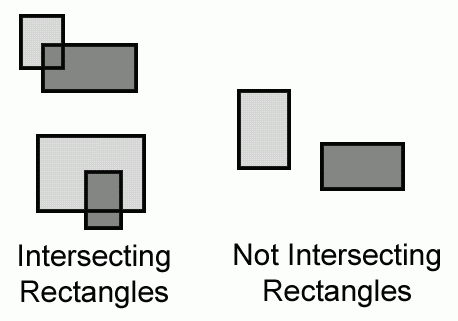
Рис. 18.2. Examples of intersecting rectangles (on the left) and rectangles that do not intersect (on the right).
We will make a single function that is passed two pygame.Rect objects. The function doRectsOverlap(), will return True if they do and False if they don't.
There is a very simple rule we can follow to determine if rectangles intersect (that is, collide). Look at each of the four corners on both rectangles. If at least one of these eight corners is inside the other rectangle, then we know that the two rectangles have collided. We will use this fact to determine if doRectsOverlap() returns True or False.
5.      for a, b in [(rect1, rect2), (rect2, rect1)]:
6.         # Check if a's corners are inside b
7.          if ((isPointInsideRect(a.left, a.top, b)) or
8.              (isPointInsideRect(a.left, a.bottom, b)) or
9.              (isPointInsideRect(a.right, a.top, b)) or
10.              (isPointInsideRect(a.right, a.bottom, b))):
11.                                return True
Above is the code that checks if one rectangle's corners are inside another. Later we will create a function called isPointInsideRect() that returns True if the XY coordinates of the point are inside the rectangle. We call this function for each of the eight corners, and if any of these calls return True, the or operators will make the entire condition True.
The parameters for doRectsOverlap() are rect1 and rect2. We first want to check if rect1's corners are inside rect2 and then check if rect2's corners are in rect1.
We don't want to repeat the code that checks all four corners for both rect1 and rect2, so instead we use a and b on lines 7 to 10. The for loop on line 5 uses the multiple assignment trick so that on the first iteration, a is set to rect1 and b is set to rect2. On the second iteration through the loop, it is the opposite. a is set to rect2 and b is set to rect1.
We do this because then we only have to type the code for the if statement on line 7 once. This is good, because this is a very long if statement. The less code we have to type for our program, the better.
13 . return False
If we never return True from the previous if statements, then none of the eight corners we checked are in the other rectangle. In that case, the rectangles did not collide and we return False.
Determining if a Point is Inside a Rectangle
15. def isPointInsideRect(x, y, rect):
16.      if (x > rect.left) and (x < rect.right) and (y > rect.top) and (y < rect.bottom) :
17.                       return True
The isPointInsideRect() function is used by the doRectsOverlap() function. isPointInsideRect() will return True if the XY coordinates passed to it as the first and second parameters are located "inside" the pygame.Rect object that is passed as the third parameter. Otherwise, this function returns False.
The pattern that points inside a rectangle have is an X-coordinate that is greater than the X-coordinate of the left side and less than the X-coordinate of the right side, and a Y-coordinate that is greater than the Y-coordinate of the top side and less than the Y-coordinate of the bottom side. If any of those conditions are false, then the point is outside the rectangle.
We combine all four of these conditions into the if statement's condition with and operators because all four of the conditions must be True.
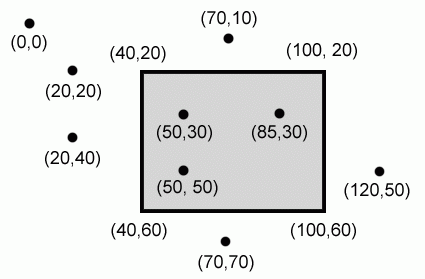
Рис. 18.3. Example of coordinates inside and outside of a rectangle. The (50, 30), (85, 30) and (50, 50) points are inside the rectangle, and all the others are outside.
18 .    else:
19.                    return False
If just one of the four expressions in the condition on line 16 is False, then we should have isPointInsideRect() return the value False.
This function will be called from the doRectsOverlap() function to see if any of the corners in the two pygame.Rect objects are inside each other. These two functions give us the power to do collision detection between two rectangles.
The pygame.time.Clock Object and tick() Method
Much of lines 22 to 43 do the same thing that Animation program in the last chapter did: initialize the Pygame library, set WINDOWHEIGHT and WINDOWWIDTH, and put together the color and direction constants. However, line 24 is new:
24. mainClock = pygame.time.Clock()
In the previous Animation program, we had a call to time.sleep(0.02) inside the game loop in order to slow down the program enough so that we could see the blocks moving. The problem with this is that the program might run too fast on fast computers and too slow on slow computers. We want to limit the maximum number of iterations through the game loop there are per second.
A pygame.time.Clock object can do this for us. You can see on line 125 that we call mainClock.tick(40) inside the game loop. This call to the Clock object's tick () method will check if we have iterated through the game loop more than 40 times in the last second. If so, it puts a short sleep into the program for us based on frequently tick() is being called. This ensures that the game never runs faster than we expect. Be sure to call tick() only once in the game loop.
Setting Up the Window and Data Structures
30. pygame.display.set_caption('Collision Detection')
31.
32. # set up the bouncer and food data structures
33.  foodCounter = 0
34. NEWFOOD = 4 0
35. FOODSIZE = 20
We are going to set up a few variables for the food blocks that appear on the screen. foodCounter will start at the value
49. bouncer = {'rect':pygame.Rect(300, 100, 50, 50), 'dir':UPLEFT}
We are going to set up a new data structure called bouncer. bouncer is a dictionary with two keys. The value stored in the 'rect' key will be a pygame.Rect object that represents the bouncer's size and position. The value stored in the 'dir' key will be a direction that the bouncer is currently moving. The bouncer will move the same way the blocks did in our previous animation program: moving in diagonal directions and bouncing off of the sides of the window.
50. foods = []
51. for i in range(20):
52 .     foods.append(pygame.Rect(random.randint(0,
WINDOWWIDTH - FOODSIZE), random.randint(0, WINDOWHEIGHT -
FOODSIZE), FOODSIZE, FOODSIZE))
Our program will keep track of every food square with a list of pygame.Rect objects called foods. At the start of the program, we want to create twenty food squares randomly placed around the screen. We can use the random.randint() function to come up with random XY coordinates.
On line 52, we will call the pygame.Rect() constructor function to return a new pygame.Rect object that will represent the position and size of the food square.
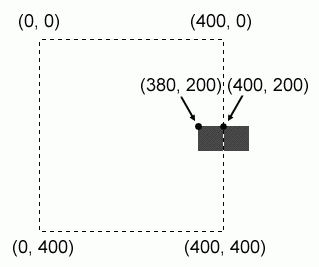
Рис. 18.4. For a 20 by 20 rectangle, having the top left corner at (400, 200) in a 400 by 400 window would place
the rectangle outside of the window. To be inside, the top left corner should be at (380, 200) instead.
The first two parameters for pygame.Rect() are the XY coordinates of the top left corner. We want the random coordinate to be between 0 and the size of the window minus the size of the food square. If we had the random coordinate between 0 and the size of the window, then the food square might be pushed outside of the window altogether. Look at the diagram in Figure 18-4.
The square on the left has an X-coordinate of its top left corner at 380. Because the food square is 20 pixels wide, the right edge of the food square is at 400. (This is because 380 + 20 = 400.) The square on the right has an X-coordinate of its top left corner at 400. Because the food square is 20 pixels wide, the right edge of the food square is at 420, which puts the entire square outside of the window (and not viewable to the user).
The third parameter for pygame.Rect() is a tuple that contains the width and height of the food square. Both the width and height will be equal to the value in the FOODSIZE constant.
Drawing the Bouncer on the Screen
Lines 71 to 109 cause the bouncer to move around the window and bounce off of the edges of the window. This code is very similar to lines 44 to 83 of our animation program in the last chapter, so we will not go over them again here.
111.     # draw the bouncer onto the surface
112.     pygame.draw.rect(windowSurface, WHITE, bouncer ['rect' ])
After moving the bouncer, we now want to draw it on the window in its new position. We call the pygame.draw.rect() function to draw a rectangle. The windowSurface passed for the first parameter tells the computer which pygame.Surface object to draw the rectangle on. The WHITE variable, which has (255, 255, 255) stored in it, will tell the computer to draw a white rectangle. The pygame.Rect object stored in the bouncer dictionary at the 'rect' key tells the position and size of the rectangle to draw. This is all the information needed to draw a white rectangle on windowSurface.
Remember, we are not done drawing things on the windowSurface object yet. We still need to draw a green square for each food square in the foods list. And we are just "drawing" rectangles on the windowSurface object. This pygame.Surface object is only inside the computer's memory, which is much faster to modify than the pixels on the screen. The window on the screen will not be updated until we call the pygame.display.update() function.
Colliding with the Food Squares
114.     # check if the bouncer has intersected with any food squares.
115.      for food in foods[:]:
Before we draw the food squares, we want to see if the bouncer has overlapped any of the food squares. If it has, we will remove that food square from the foods list. This way, the computer won't draw any food squares that the bouncer has "eaten".
On each iteration through the for loop, the current food square from the foods (plural list will be stored inside a variable called food (singular).
Don't Add to or Delete from a List while Iterating Over It
Notice that there is something slightly different with this for loop. If you look carefully at line 116, we are not iterating over foods but actually over foods[:]. Just as foods [:2] would return a copy of the list with the items from the start and up to (but not including) the item at index 2, and just as foods[3:] would return a copy of the list with the items from index 3 to the end of the list, foods[:] will give you a copy of the list with the items from the start to the end. Basically, foods[:] creates a new list with a copy of all the items in foods. (This is a shorter way to copy a list than our getBoardCopy() function in the Tic Tac Toe game.)
Why would we want to iterate over a copy of the list instead of the list itself? It is because we cannot add or remove items from a list while we are iterating over it. Python can lose track of what the next value of food variable should be if the size of the foods list is always changing. Think of how difficult it would be for you if you tried to count the number of jelly beans in a jar while someone was adding or removing jelly beans. But if we iterate over a copy of the list (and the copy never changes), then adding or removing items from the original list won't be a problem.
Removing the Food Squares
116.          if doRectsOverlap(bouncer['rect'], food):
117.              foods.remove(food)
Line 116 is where our doRectsOverlap() function that we defined earlier comes in handy. We pass two pygame.Rect objects to doRectsOverlap(): the bouncer and the current food square. If these two rectangles overlap, then doRectsOverlap() will return True and we will remove the overlapping food squares from foods list.
Drawing the Food Squares on the Screen
119.     # draw the food
120.      for i in range(len(foods)):
121.         pygame.draw.rect(windowSurface, GREEN, foods[i])
The code on lines 120 and 121 are very similar to how we drew the white square for the player. We will loop through each food square in the foods list, and then draw the rectangle onto the windowSurface surface. This demonstration of collision detection is fairly easy. This program was very similar to our bouncing program in the previous chapter, except now the bouncing square will "eat" the other squares as it passes over them
These past few programs are interesting to watch, but the user does not get to actually control anything. In this next program, we will learn how to get input from the keyboard. Keyboard input is handled in Pygame by using events.