

|
1 октября отправила на проверку первое задание, до сих пор не проверено, по этой причине не могу пройти последующие тесты. |
Опубликован: 18.11.2015 | Доступ: свободный | Студентов: 2634 / 0 | Длительность: 22:20:00
Специальности: Преподаватель
Лекция 10:
Learning and teaching
PART 1 CLASSROOM MANAGEMENT
In order to achieve your aim you must be able to 'manage' your class. There are techniques which good ESOL teachers follow making the management of their classes more professional, skilful and above all which facilitate the achievement of the overall aim of involving all the students all the time and making them active learners .
Every teacher develops his/her own style of classroom management, as our behaviour as teachers is linked to our personality preferences - how much noise or silence we can stand, how good we are at organizing paperwork and so on. But thinking about the things in this unit, every lesson is essential in order to achieve your aim. Some of them seem obvious but they are easy to forget ! One useful statement to repeat to yourself might be:
‘TEACHING’ IS NOT ‘LEARNING’.
Standing at the front of the class and telling people things (teaching) is no guarantee they will learn them (learning). So you need to make your students ‘learners’ - taking part in what is happening in the classroom. This is the way they will get the most out of their lessons - much more than listening to you telling them. In this part of the module we are looking at three key areas of every day classroom management:
Questions
Differences in students
THE ‘BASICS’ OF EVERYDAY CLASS MANAGEMENT
LOOK AT ALL THE STUDENTS IN THE CLASS.
Switch your gaze from side to side and back to front of your class. It is so easy to stick with an area of friendly faces, but this is unfair on the others who will then not be so involved in the lesson. Try to move around the class sometimes - not only to check what the students are doing but also to deliver input from a different direction. For example, if you have done some good board work that you want the students to focus on, you can move to the back of the class and explain the diagram from behind the students so their gaze is on the board. It also encourages them to listen.
If you are talking about flowers and trees, move to the window! If you are teaching classroom equipment, move around the room picking up the pens and pencils of different students, don’t just use a pile on your desk.
A non-stop teacher may come across to the students as a prowling lion and they may feel uneasy if they never know when you are going to pop up behind them. But a teacher ‘glued to the board’ can be easy to ignore - ‘she’s never going to come over my way….’
STUDENT NAMES
Pronounce the names of your students correctly. It is no excuse that their names are very difficult to remember let alone pronounce.
Make yourself a seating plan/chart and write their names phonetically, you would not like it if you were always called the wrong name or almost the right name but not quite. You may inadvertently change the sex of the person by changing one letter in their name! Getting their names right as soon as possible shows your respect for them as people. Involve them in your learning of their name. Ask them to correct your pronunciation and ask them what their name means.
SEATING
Make sure that all the students can see the visual aids. If you make your own, think of the student with poor sight!
Group students rather than seat them in rows. No communication can take place when students are looking at the back of someone's head. The best arrangement is a circle - all students can be involved and they become a community. Often you will need to rearrange the furniture, do not be afraid to do this and to explain that you are doing this to aid communication. If you cannot achieve the best, a semi-circle or some sort of group arrangement will work.
Whilst you cannot be moving the furniture around all the time in a lesson, getting students to help you set up as they come in and put tables back at the end of the lesson will only take a couple of minutes and can really stimulate an activity.
Some poor teachers are unable to move the tables around as they are fixed to the floor, or have desk chair combinations. This is getting rarer but can still be the case in older buildings. Chairs are also sometimes joined to the desks. Then there is the room where there is very little space to move the furniture. Try these tips:
If you want the students to work with a different person, then start the lesson with a find your partner exercise that involves the whole class walking around. They spend the rest of the lesson with their new partner. For information gap activities and group work you can do forward and back pairs, getting one pair to turn round to another pair.
With any class, five minutes thinking about who is best sat next to who at the beginning of the lesson is always worth the time and effort.
Now consider the following extract:
Now consider the following extract:
Whole-class teaching
When people think of teaching and learning, they frequently conjure up a picture of students sitting in rows listening to a teacher who stands in front of them. For many, this is what teaching means, and it is still the most common teacher-student interaction in many cultures. Though it has many limitations, whole-class grouping like this has both practical advantages and disadvantages.
Advantages of whole-class grouping:
- It reinforces a sense of belonging among the group members, something which we as teachers need to foster (Williams and Burden 1997: 79). If everyone is involved in the same activity, then we are all in it together and such experiences give us points of common reference to talk about and use as reasons to bond with each other. It is much easier for students to share an emotion such as happiness or amusement in a whole ¬class setting. Twenty people laughing is often more enjoyable than just two; 40 people holding their breath in anticipation create a much more engaging atmosphere than just the person sitting next to you. In other words, if language learning is a collective endeavour, then 'learning takes place most effectively when language classes pull together as unified groups' (Senior 2002: 402).
- It is suitable for activities where the teacher is acting as a controller. It is especially good for giving explanations and instructions, where smaller groups would mean having to do these things more than once. It is ideal for presenting material, whether in pictures, texts or on audio or video tape. It is also more cost-efficient, both in terms of material production and organisation, than other groupings can be.
- It allows teachers to 'gauge the mood' of the class in general (rather than on an individual basis); it is a good way for us to get a general understanding of student progress.
- It is the preferred class style in many educational settings where students and teachers feel secure when the whole class is working in lockstep and under the direct authority of the teacher.
Disadvantages of whole-class grouping:
- It favours the group rather than the individual. Everyone is forced to do the same thing at the same time and at the same pace.
- Individual students do not have much of a chance to say anything on their own.
- Many students are disinclined to participate in front of the whole class since to do so brings with it the risk of public failure.
- It may not encourage students to take responsibility for their own learning. Whole-class teaching favours the transmission of knowledge from teacher to student rather than having students discover things or research things for themselves.
- It is not the best way to organise communicative language teaching or specifically task-based sequences. Communication between individuals is more difficult in a group of 20 or 30 than it is in groups of four or five. In smaller groups it is easier to share material, speak quietly and less formally, and make good eye contact. All of these contribute to successful task resolution.
Seating whole-group classes
There are many different ways of seating classes when they are working as a whole group. One of the most common is to have students seated in orderly rows (see Figure 10.1).
There are considerable advantages to orderly row seating. The teacher has a clear view of all the students and the students can all see the teacher. Lecturing is easier with such a seating arrangement since it enables the teacher to maintain eye contact with the people he or she is talking to. Orderly rows allow the teacher to work with the whole class. Some activities are especially suited to this kind of organisation, such as explaining a grammar point, watching a video! DVD or a PowerPoint (or other computer-based) presentation, or using the board or an overhead projector. It is also useful when students are involved in certain kinds of language practice. If all the students are focused on a task at the same time, the whole class gets the same messages. It is often easier to create a good whole-class dynamic when students are sitting as one group - rather than many - in orderly rows. Two other common seating arrangements are circle and horseshoe (see Figure 10.2). These are especially appropriate for smaller groups (i.e. fewer than 20 students). In a horseshoe, the teacher will probably be at the open end of the arrangement since that may well be where the board, overhead projector and/or computer are situated. In a circle, the teacher's position - where the board is situated - is less dominating.
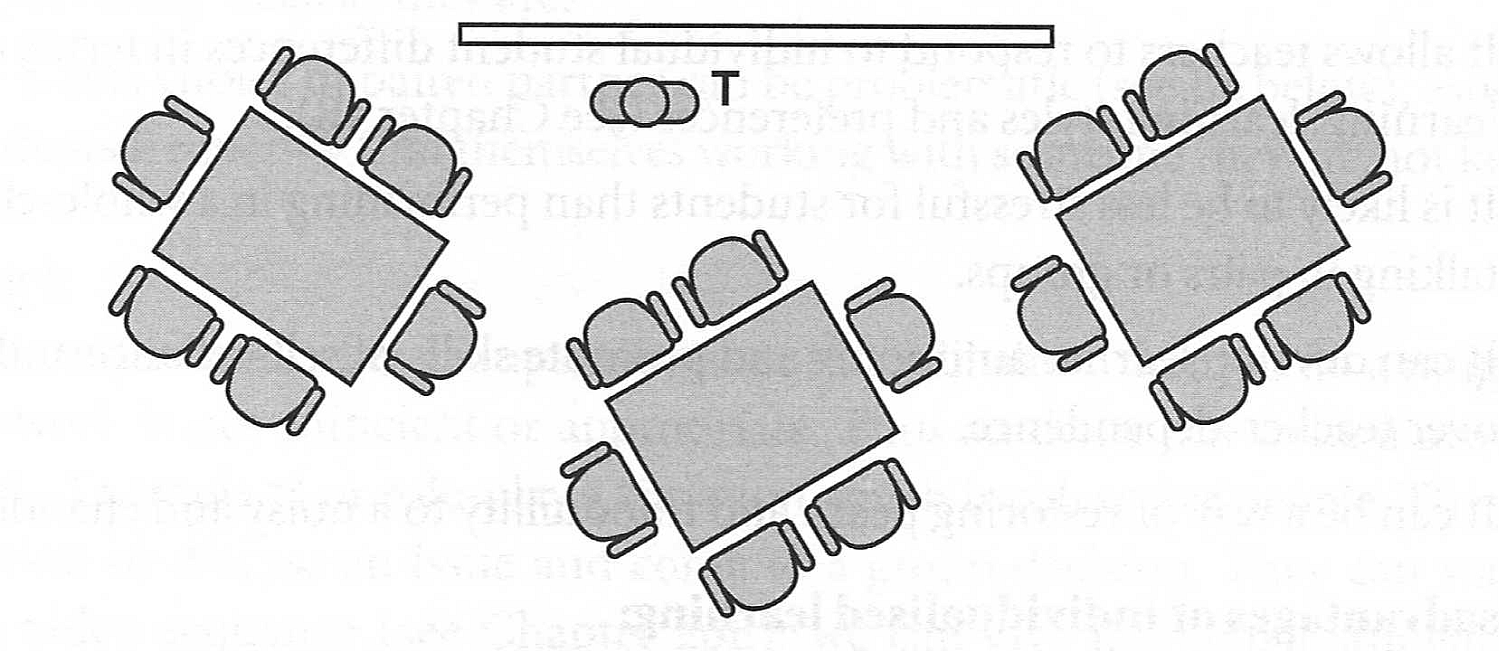
Classes which are arranged in a circle make quite a strong statement about what the teacher and the students believe in. With all the people in the room sitting in a circle, there is a far greater feeling of equality than when the teacher stays out at the front. This may not be quite so true of the horseshoe shape, where the teacher is often located in a commanding position, but, even here, the rigidity that comes with orderly rows, for example, is lessened. With horseshoe and circle seating, the classroom is a more intimate place and the potential for students to share feelings and information through talking, eye contact or expressive body movements (eyebrow-raising, shoulder-shrugging, etc.) is far greater than when they are sitting in rows, one behind the other. In some classrooms students sit in groups at separate tables (see Figure 10.3), whether they are working as a whole class, in groups or in pairs. In such classrooms, you might see the teacher walking around checking the students' work and helping out if they are having difficulties - prompting the students at this table, or explaining something to the students at that table in the corner.
A huge advantage of separate tables is that groupwork is easy to arrange. Indeed, such an arrangement means that groupwork is likely to be far more common than with other kinds of seating. Separate table seating is especially useful in mixed-ability classes, where different groups of students can benefit from concentrating on different tasks (designed for different ability levels). Separate tables are more difficult to ‘teach to' in whole-group activities, depending, of course, on the size of the room and the group. It is also important to bear in mind that students may not want to be stuck with the same three or four students for ever. Nevertheless, when students are working together, such a seating arrangement is ideal.
There are other ways of seating students, of course. Jim Scrivener, for example, suggests groupings such as ‘enemy corners’ (where two groups get into opposite corners of the room), opposing teams, and face-to-face (or back-to-back), where students sit in rows to make pairs (Scrivener 2005: 89).
The point of all these different sitting (and standing) arrangements is that we should choose the best one for the students and, especially, the task. Insofar as we can make a general statement about it, it is worth pointing out that, where possible, varying the seating arrangements will make our lessons more dynamic and enjoyable.
Students on their own
At the opposite end of the spectrum from whole-class grouping is the idea of students on their own, working in a pattern of individualised learning. This can range from students doing exercises on their own in class, to situations in which teachers are able to spend time working with individual students, or when students take charge of their own learning in self-access centres or other out-of-class environments. Such individualised learning is a vital step in the development of learner autonomy. If we wish students to work on their own in class, we can, for example, allow them to read privately and then answer questions individually; we can ask them to complete worksheets or writing tasks by themselves. We can give them worksheets with several different tasks and allow individuals to make their own decisions about which tasks to do. We can hand out different worksheets to different individuals, depending upon their tastes and abilities. We can allow students to research on their own or even choose what they want to read or listen to.
Advantages of individualised learning:
- It allows teachers to respond to individual student differences in terms of pace of learning, learning styles and preferences.
- It allows teachers to respond to individual student differences in terms of pace of learning, learning styles and preferences.
- It can develop learner autonomy and promote skills of self-reliance and investigation over teacher-dependence.
- It can be a way of restoring peace and tranquility to a noisy and chaotic classroom.
Disadvantages of individualised learning:
- It does not help a class develop a sense of belonging. It does not encourage cooperation in which students may be able to help and motivate each other.
- When combined with giving individual students different tasks, it means a great deal more thought and materials preparation than whole-class teaching involves. When we work with individual students as a tutor or resource, it takes much more time than interacting with the whole class.